Control Windows 10's "Power Mode" programmatically

Viewed 1742

Background

Hi. I have an SB2 (Surface Book 2), and I'm one of the unlucky users who are facing the infamous 0.4GHz throttling problem that is plaguing many of the SB2 machines. The problem is that the SB2 suddenly, and very frequently depending on the ambient temperature, throttles heavily from a boost of 4GHz to 0.4GHz and hangs in there for a minute or two (this causes a severe slowup of the whole laptop). This is extremely frustrating and almost makes the machine unusable for even the simplest of workloads.

Microsoft apparently stated that it fixed the problem in the October 2019 update, but I and several other users are still facing it. I'm very positive my machine is up to date, and I even manually installed all the latest Surface Book 2 firmware updates.

Here's a capture of the CPU state when the problem is happening: throttling-image

As you can see, the temperature of the unit itself isn't high at all, but CPU is throttling at 0.4GHz exactly.

More links about this: 1 2

Workarounds

I tried pretty much EVERYTHING. Undervolting until freezing screens, disabling BD PROCHOT, disabling power throttling in GPE, messing up with the registry, tuning several CPU/GPU settings. Nothing worked.

You can do only 2 things when the throttling starts:

  1. Wait for it to finish (usually takes a minute or two).
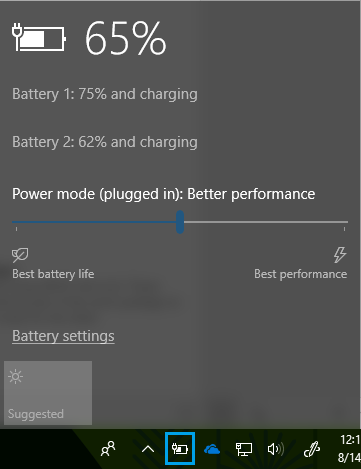
  2. Change the Power Mode in windows 10. It doesn't even matter if you're changing it from "Best performance" to "Best battery life", what matters is that you change it. As soon as you do, throttling completely stops in a couple seconds. This is the only manual solution that worked.
Question

In practice, changing this slider each 10 seconds no matter how heavy the workload is, indefinitely lead to a smooth experience without throttling. Of course, this isn't a feasible workaround by hand.

In theory, I thought that if I could find a way to control this mode programmatically, I might be able to wish this problem goodbye by switching power modes every 10 seconds or so.

I don't mind if it's in win32 (winapi) or a .net thing. I looked a lot, found this about power management, but it seems there's no interface for setting in win32. I could have overlooked it, so here's my question:

Is there any way at all to control the Power Mode in Windows 10 programmatically?

3 Answers

OK... I've been wanting command line or programmatic access to adjust the power slider for a while, and I've run across this post multiple times when looking into it. I'm surprised no one else has bothered to figure it out. I worked it out myself today, motivated by the fact that Windows 11 appears to have removed the power slider from the taskbar and you have to go digging into the Settings app to adjust it.

As previously discussed, in the registry key HKEY_LOCAL_MACHINE\SYSTEM\CurrentControlSet\Control\Power\User\PowerSchemes you can find values "ActiveOverlayAcPowerScheme" and "ActiveOverlayDcPowerScheme" which record the current values of the slider for AC power and battery power, respectively. However, changing these values is not sufficient to adjust the power slider or the system's mode of operation.

Turns out there is an undocumented method in C:\Windows\System32\powrprof.dll called PowerSetActiveOverlayScheme. It takes a single parameter. I "guessed" that it would take a GUID in the same manner that PowerSetActiveScheme does, and it seems to work.

Note — Using an undocumented API is unsupported by Microsoft. This method may break in future Windows releases. It can be used for personal tinkering but I would not suggest using it in any actual production projects.

Here is the C# PInvoke signature:

[DllImportAttribute("powrprof.dll", EntryPoint = "PowerSetActiveOverlayScheme")]
public static extern uint PowerSetActiveOverlayScheme(Guid OverlaySchemeGuid);

It returns zero on success and non-zero on failure.

Calling it is as simple as:

PowerSetActiveOverlayScheme(new Guid("ded574b5-45a0-4f42-8737-46345c09c238"));

It has immediate effect. This particular GUID moved the slider all the way to the right for me and also updated the "ActiveOverlayAcPowerScheme" value in the registry. Using a GUID of all zeros reset the slider to the middle value. You can see what GUID options are available by just observing the values that show up in the registry when you set the power slider to different positions.

There are two methods that can be used to read the current position of the slider. I'm not sure what the difference between them is, they returned the same value each time in my testing.

[DllImportAttribute("powrprof.dll", EntryPoint = "PowerGetActualOverlayScheme")]
public static extern uint PowerGetActualOverlayScheme(out Guid ActualOverlayGuid);

[DllImportAttribute("powrprof.dll", EntryPoint = "PowerGetEffectiveOverlayScheme")]
public static extern uint PowerGetEffectiveOverlayScheme(out Guid EffectiveOverlayGuid);

They also return zero on success and non-zero on failure. They can be called like...

if (PowerGetEffectiveOverlayScheme(out Guid activeScheme) == 0)
{
    Console.WriteLine(activeScheme);
}

There is one more method called "PowerGetOverlaySchemes", which I presume can be used to fetch a list of available GUIDs that could be used. It appears to take three parameters and I haven't bothered with figuring it out.

I created a command-line program which can be used to set the power mode, and it can be found at https://github.com/AaronKelley/PowerMode.

Aaron's answer is awesome work, helped me massively, thank you.

If you're anything like me and

  1. don't have Visual Studio at the ready to compile his tool for yourself and/or

  2. don't necessarily want to run an arbitrary executable file off of GitHub (no offence),

you can use Python (3, in this case) to accomplish the same thing.

For completeness' sake, I'll copy over the disclaimer:

Note — Using an undocumented API is unsupported by Microsoft. This method may break in future Windows releases. It can be used for personal tinkering but I would not suggest using it in any actual production projects.

Please also note, that the following is just basic proof-of-concept code!

Getting the currently active Byte Sequence:

import ctypes

output_buffer = ctypes.create_string_buffer(b"",16)

ctypes.windll.powrprof.PowerGetEffectiveOverlayScheme(output_buffer)
print("Current Effective Byte Sequence: " + output_buffer.value.hex())

ctypes.windll.powrprof.PowerGetActualOverlayScheme(output_buffer)
print("Current Actual Byte Sequence: " + output_buffer.value.hex())

On my system, this results in the following values:

Mode Byte Sequence
Better Battery 77c71c9647259d4f81747d86181b8a7a
Better Performance 00000000000000000000000000000000
Best Performance b574d5dea045424f873746345c09c238

Apparently Aaron's and my system share the same peculiarity, where the "Better Performance" Byte Sequence is just all zeros (as opposed to the "expected" value of 3af9B8d9-7c97-431d-ad78-34a8bfea439f).

Please note, that the Byte Sequence 77c71c9647259d4f81747d86181b8a7a is equivalent to the GUID 961cc777-2547-4f9d-8174-7d86181b8a7a and b574d5dea045424f873746345c09c238 represents ded574b5-45a0-4f42-8737-46345c09c238.

This stems from the the fact that GUIDs are written down differently than how they're actually represented in memory. (If we assume a GUID's bytes to be written as ABCD-EF-GH-IJ-KLMN its Byte Sequence representation ends up being DCBAFEHGIJKLMN). See https://stackoverflow.com/a/6953207 (particularly the pararaph and table under "Binary encodings could differ") and/or https://uuid.ramsey.dev/en/latest/nonstandard/guid.html if you want to know more.

Setting a value (for "Better Battery" in this example) works as follows:

import ctypes

modes = {
    "better_battery":     "77c71c9647259d4f81747d86181b8a7a",
    "better_performance": "00000000000000000000000000000000",
    "best_performance":   "b574d5dea045424f873746345c09c238"
}

ctypes.windll.powrprof.PowerSetActiveOverlayScheme(bytes.fromhex(modes["better_battery"]))

For me, this was a nice opportunity to experiment with Python's ctypes :).

Here is a PowerShell version that sets up a scheduled task to toggle the power overlay every minute. It is based off the godsend answers of Michael and Aaron.

The CPU throttling issue has plagued me on multiple Lenovo X1 Yoga laptops (Gen2 and Gen4 models).

# Toggle power mode away from and then back to effective overlay 
$togglePowerOverlay = {
    $function = @'
    [DllImport("powrprof.dll", EntryPoint="PowerSetActiveOverlayScheme")]
    public static extern int PowerSetActiveOverlayScheme(Guid OverlaySchemeGuid);
    [DllImport("powrprof.dll", EntryPoint="PowerGetActualOverlayScheme")]
    public static extern int PowerGetActualOverlayScheme(out Guid ActualOverlayGuid);
    [DllImport("powrprof.dll", EntryPoint="PowerGetEffectiveOverlayScheme")]
    public static extern int PowerGetEffectiveOverlayScheme(out Guid EffectiveOverlayGuid);
'@
    $power = Add-Type -MemberDefinition $function -Name "Power" -PassThru -Namespace System.Runtime.InteropServices
    
    $modes = @{
        "better_battery"     = [guid] "961cc777-2547-4f9d-8174-7d86181b8a7a";
        "better_performance" = [guid] "00000000000000000000000000000000";
        "best_performance"   = [guid] "ded574b5-45a0-4f42-8737-46345c09c238"
    }
    
    $actualOverlayGuid = [Guid]::NewGuid()
    $ret = $power::PowerGetActualOverlayScheme([ref]$actualOverlayGuid)
    if ($ret -eq 0) {
        "Actual power overlay scheme: $($($modes.GetEnumerator()|where {$_.value -eq  $actualOverlayGuid}).Key)." | Write-Host
    }
    
    $effectiveOverlayGuid = [Guid]::NewGuid()
    $ret = $power::PowerGetEffectiveOverlayScheme([ref]$effectiveOverlayGuid)
    
    if ($ret -eq 0) {        
        "Effective power overlay scheme: $($($modes.GetEnumerator() | where { $_.value -eq  $effectiveOverlayGuid }).Key)." | Write-Host
        
        $toggleOverlayGuid = if ($effectiveOverlayGuid -ne $modes["best_performance"]) { $modes["best_performance"] } else { $modes["better_performance"] }     
        
        # Toggle Power Mode
        $ret = $power::PowerSetActiveOverlayScheme($toggleOverlayGuid)
        if ($ret -eq 0) {
            "Toggled power overlay scheme to: $($($modes.GetEnumerator()| where { $_.value -eq  $toggleOverlayGuid }).Key)." | Write-Host
        }

        $ret = $power::PowerSetActiveOverlayScheme($effectiveOverlayGuid)
        if ($ret -eq 0) {
            "Toggled power overlay scheme back to: $($($modes.GetEnumerator()|where {$_.value -eq  $effectiveOverlayGuid }).Key)." | Write-Host
        }
    }
    else {
        "Failed to toggle active power overlay scheme." | Write-Host      
    }
}

# Execute the above
& $togglePowerOverlay

Create a scheduled job that runs the above script every minute:

  • Note that Register-ScheduledJob only works with Windows PowerShell, not PowerShell Core
  • I couldn't get the job to start without using the System principal. Otherwise gets stuck indefinitely in Task Scheduler with "The task has not run yet. (0x41303)".
  • Get-Job will show the job in Windows PowerShell, but Receive-Job doesn't return anything even though there is job output in dir $env:UserProfile\AppData\Local\Microsoft\Windows\PowerShell\ScheduledJobs$taskName\Output. This might be due to running as System while trying to Receive-Job as another user?
  • I wish -MaxResultCount 0 was supported to hide the job in Get-Job, but alas it is not.
  • You can see the task in Windows Task Scheduler under Task Scheduler Library path \Microsoft\Windows\PowerShell\ScheduledJobs
  • It was necessary to have two script blocks, one as command and one as arguments (that gets serialized/deserialized as a string) because PowerShell script blocks use dynamic closures instead of lexical closures and thus referencing one script block from another when creating a new runspace is not readily possible.
  • The min interval for scheduled tasks is 1 minute. If it turns out that more frequent toggling is needed, might just add a loop in the toggling code and schedule the task only for startup or login.
$registerJob = {
    param($script)
    $taskName = "FixCpuThrottling"
    Unregister-ScheduledJob -Name $taskName -ErrorAction Ignore
    $job = Register-ScheduledJob -Name $taskName -ScriptBlock $([scriptblock]::create($script)) -RunEvery $([TimeSpan]::FromMinutes(1)) -MaxResultCount 1
    $psSobsSchedulerPath = "\Microsoft\Windows\PowerShell\ScheduledJobs";
    $principal = New-ScheduledTaskPrincipal -UserId SYSTEM -LogonType ServiceAccount 
    $someResult = Set-ScheduledTask -TaskPath $psSobsSchedulerPath -TaskName $taskName -Principal $principal
}

# Run as Administrator needed in order to call Register-ScheduledJob
powershell.exe -command $registerJob -args $togglePowerOverlay

To stop and remove the scheduled job (must use Windows PowerShell):

$taskName = "FixCpuThrottling"
Unregister-ScheduledJob -Name $taskName-ErrorAction Ignore
Related